Trendy Nail Shapes for Perfect Lipstick Nails
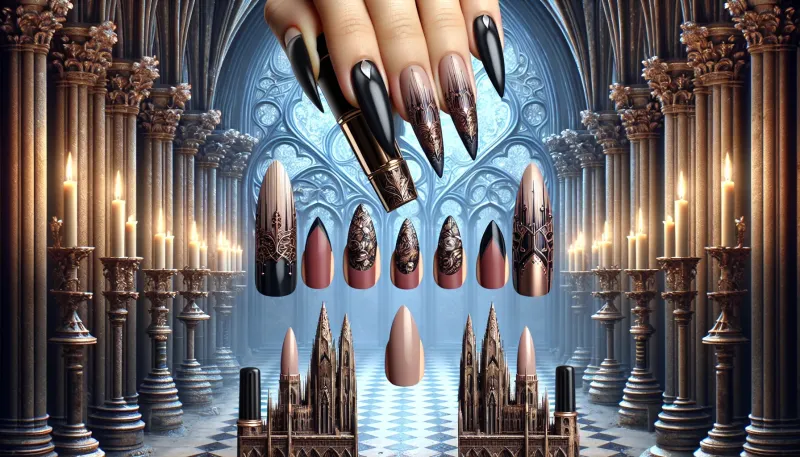
Discover the best nail shapes for achieving perfect lipstick nails. Get expert tips and advice on how to achieve trendy lipstick nail shapes.
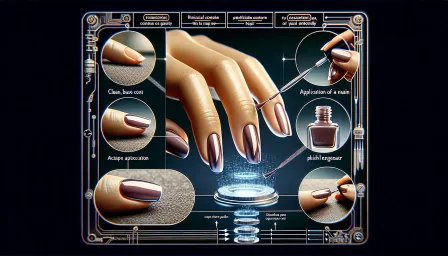
With the ever-evolving world of nail art, one style that stands out and continues to gain popularity is the lipstick nail shape. Known for its unique and edgy look, this nail style mimics the slanted tip of a classic lipstick bullet, giving your nails a sassy twist. However, achieving this trendy look requires understanding the best nail shapes for lipstick nails. In this comprehensive guide, we will explore various nail shapes that complement the lipstick nail design, offering expert tips and advice for creating the perfect lipstick nails.
Understanding Lipstick Nails
Lipstick nails are characterized by their angled tips, resembling the cut of a freshly opened lipstick. This distinctive style offers a blend of elegance and boldness that appeals to fashion-forward individuals. Before diving into the best nail shapes for lipstick nails, it is essential to understand the dynamics of this design.
Typically, lipstick nails are crafted on longer nails to ensure the slanted effect is prominent and visible. The design can be achieved on natural nails, acrylics, or gels. A steady hand and precision are crucial for creating the perfect angle, making a visit to a professional nail technician often highly recommended for this intricate shape.
Best Nail Shapes for Lipstick Nails
Selecting the appropriate nail shape is pivotal for achieving flawless lipstick nails. Below are some of the most popular and effective nail shapes for this trendy design:
1. Square Nails
Square nails are defined by their straight edges and sharp corners. The flat tip of square-shaped nails provides a stable base for executing the angled tip of the lipstick nail design. This shape is perfect for those who prefer a classic yet contemporary look.
Pro Tip: When shaping square nails for lipstick designs, ensure that your nails are slightly longer to emphasize the angled cut.
2. Stiletto Nails
Known for their dramatic and elongated appearance, stiletto nails taper to a sharp point. Although challenging to maintain, the pointed tips of stiletto nails can be easily adapted into the lipstick shape, offering a fierce and avant-garde aesthetic.
Pro Tip: Ensure that the stiletto nails are adequately reinforced with acrylic or gel to maintain durability.
3. Almond Nails
Almond nails are characterized by their slender sides and rounded tips. This shape mirrors the natural curve of the cuticle and provides a softer alternative to stiletto nails. Almond nails can be reshaped into the lipstick design by creating a subtle angle at the tip.
Pro Tip: Opt for a slightly less pronounced angle when fashioning lipstick nails from almond-shaped nails to maintain the elegance of the almond contour.
4. Coffin/Ballerina Nails
Coffin or ballerina nails features a tapered shape that ends in a squared-off tip, resembling a coffin or ballerina shoe. This shape is perfect for longer nails and provides an excellent canvas for lipstick nail designs. The squared-off tip easily accommodates the slanted cut required for lipstick nails.
Pro Tip: Keep the nails long enough to ensure the angled tip is distinct and noticeable.
Achieving the Perfect Lipstick Nail Shape
Creating lipstick nails requires precision and a keen eye for detail. Follow these steps to achieve the perfect lipstick nail shape:
Step 1: Choose the Right Nail Shape
Start by selecting the nail shape that best suits your preferences and lifestyle. Consider the shapes mentioned above for a solid foundation.
Step 2: Grow Your Nails
If you’re working with natural nails, ensure they are sufficiently long to accommodate the angled cut. Consider using nail strengtheners to promote growth.
Step 3: Shape the Base
File your nails into the chosen shape, ensuring they are even and symmetrical. This step is crucial for achieving a balanced lipstick tip.
Step 4: Create the Lipstick Angle
Using a nail file, carefully file one side of the nail tip at an angle, emulating the cut of a lipstick bullet. Ensure the angle is consistent across all nails for a cohesive look.
Step 5: Finish and Polish
Smooth any rough edges with a buffer and apply a base coat, followed by your chosen nail polish color. Finish with a top coat to seal and protect the design.
Common Mistakes to Avoid
While creating lipstick nails can be a fun and rewarding process, there are some common mistakes to avoid:
- Inconsistent Angles: Ensure all nails have the same angled tip for a uniform appearance.
- Weak Nail Structure: Reinforce nails with acrylic or gel if they are prone to breaking or chipping.
- Improper Filing Techniques: Use a gentle and controlled motion when filing to avoid damaging the nail bed.
Conclusion
Achieving the perfect lipstick nails involves selecting the right nail shape and executing precise techniques. Whether you prefer the stability of square nails, the drama of stiletto nails, the elegance of almond nails, or the elongated look of coffin nails, each shape offers a unique foundation for lipstick nails. By following expert tips and avoiding common mistakes, you can master this trendy nail design and flaunt your stylish and edgy nails with confidence.
Remember, investing in the expertise of a professional nail technician can significantly enhance your results, ensuring your lipstick nails are flawless and long-lasting. Happy styling!
RELATED ARTICLES


LATEST ARTICLES