Essential Pedicure Steps for Perfectly Pampered Feet

Learn the essential pedicure steps for perfectly pampered feet. This guide offers expert advice on achieving salon-quality results at home.
Your feet work hard for you every day, so why not give them the care they deserve? A well-executed pedicure can make your feet look great, feel rejuvenated, and even improve your overall well-being. In this comprehensive guide, we will take you through each essential pedicure step, ensuring that you achieve perfectly pampered feet right at home.
Why Pedicures Matter
Before diving into the individual pedicure steps, it's important to understand why regular pedicures are beneficial. Not only do they enhance the aesthetic appearance of your feet, but they also offer several health benefits. Pedicures can help prevent nail diseases, reduce the risk of infections, and alleviate foot-related discomfort.
Essential Pedicure Tools and Materials
To ensure you get the best results, gather the following tools and materials:
- Nail clippers
- Nail file
- Cuticle pusher
- Pumice stone or foot file
- Foot soak or basin with warm water
- Exfoliating scrub
- Moisturizing lotion or foot cream
- Base coat, nail polish, and top coat
- Clean towels
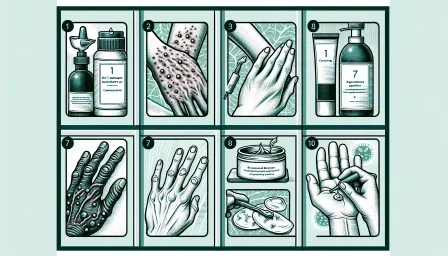
Step-by-Step Pedicure Process
1. Preparation
Start by removing any old nail polish with a gentle nail polish remover. Make sure all traces of color are gone to create a clean canvas for your new pedicure.
2. Soak Your Feet
Fill a basin with warm water and add a foot soak solution or a few drops of essential oils. Soak your feet for 10-15 minutes to soften the skin and relax the muscles. This step is crucial for making the following pedicure steps more effective and enjoyable.
3. Exfoliate and Remove Calluses
Using an exfoliating scrub, gently massage your feet to remove dead skin cells. Focus on the heels and other rough areas. After exfoliating, use a pumice stone or foot file to smooth any remaining calluses. This process will make your feet feel incredibly soft and smooth.
4. Trim and Shape Nails
After drying your feet with a clean towel, use nail clippers to trim your nails straight across. This prevents ingrown toenails. Then, use a nail file to shape the edges and smooth any rough areas, filing in one direction to avoid splitting the nails.
5. Tackle Cuticles
Apply a cuticle remover or a few drops of cuticle oil to soften the cuticles. Gently push them back using a cuticle pusher. Be careful not to cut the cuticles, as this can lead to infections.
6. Moisturize
Massage a generous amount of moisturizing lotion or foot cream into your feet, focusing on the heels and dry areas. This step will keep your feet hydrated and smooth.
7. Apply the Nail Polish
If you're adding color, start with a base coat to protect your nails. Apply two thin coats of your chosen nail polish, allowing each layer to dry completely. Finish with a top coat to seal and add shine.
8. Final Touches
Clean any stray polish around the nails with a cotton swab dipped in nail polish remover. Let your nails dry completely before putting on socks or shoes to avoid smudging.
Common Pedicure Mistakes to Avoid
A flawless at-home pedicure is achievable by avoiding these common mistakes:
- Over-Exfoliating: Too much scrubbing can irritate the skin. Aim for once a week to keep your feet smooth without causing damage.
- Skipping the Base Coat: A base coat protects your nails from staining and makes your polish last longer.
- Ignoring the Cuticles: Neglecting your cuticles can lead to hangnails and infections. Always take time to care for them.
- Applying Thick Coats of Polish: Thicker layers take longer to dry and are more prone to smudging. Opt for thin, even layers instead.
FAQs About Pedicure Steps
How often should you get a pedicure?
For most people, a monthly pedicure is sufficient to maintain healthy, beautiful feet. However, if you are prone to calluses or frequently wear open-toe shoes, a bi-weekly regimen may be more effective.
Can you do a pedicure without removing cuticles?
While you don't have to remove cuticles completely, pushing them back is highly recommended to avoid infections and achieve a polished appearance. Use a cuticle oil to soften them before pushing them back gently.
What is the best time to do a pedicure at home?
The best time to do a pedicure is after a shower when your skin is already softened. Alternatively, you may choose any time that allows you to relax and focus on pampering your feet without rushing through the steps.
Conclusion
A well-executed pedicure can be both a pampering experience and a beneficial foot care routine. By following these essential pedicure steps, you can achieve salon-quality results in the comfort of your home. Regular pedicures not only enhance the beauty of your feet but also contribute to your overall foot health. So take the time, gather your materials, and treat yourself to a perfectly pampered pedicure experience.
RELATED ARTICLES


LATEST ARTICLES